Hi there! This 10th part of the series will talk about getting the main loop into shape, allowing for ‘game modes’. This is needed because it will allow us to do more with the game: playing, showing game over message, entering names, doing the attract mode without creating one gigantic mess of a loop.
After we have knocked the main loop into shape we will restructure the code that we already have. Then we are ready to add the Game Over message in a way that will enable us to repeat adding features to the game in a controlled manner. That will also complete the game cycle!
Note
As always, keep up to date with the code changes and additions in the GitHub respository available here: https://github.com/wiebow/tetris.c64
Game Loop and Modes
We want to be able to steer the game flow more easily. A well proven solution for this is the ‘state machine’ concept. This is a lot more flexible than creating one big loop and adding more and more functionality. That is messy and it is really hard to write reusable code. Reusing code is important, because we want to stay under the 4K code size. Well, at least I want to do that as a personal little challenge. :)
Right now the game loop is one big logical loop; the main loop also includes the game update code. We want to get rid of this and go towards this model:
- Set up
- Reset game
- Set mode, enter loop
- Wait for screen refresh
- Determine mode and do relevant stuff, mode can also be changed
- Go to 4 (until the player turns the C64 off)
So here we go. First we define the game modes and then we create a new loop that will check the mode and then run the correct subroutines. It’s that easy:
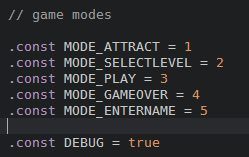
I think we will need these game modes. I also created a DEBUG constant, which we need if we want to use conditional compiling. By setting this const to false and then compile we can skip compiling code that is defined in a kick assembler .if directive:
.if (DEBUG) {
lda #$01
sta $d020
}
You will see the example in the following screenshot that also shows the new main game loop:
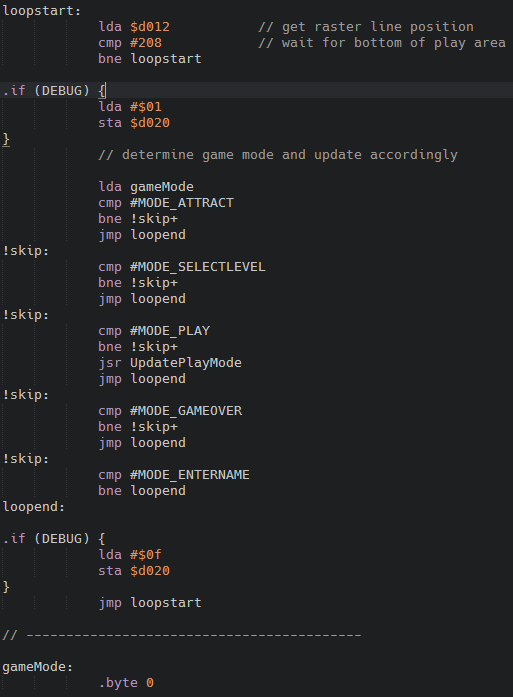
The mode variable is checked and the proper code is called. For now, only the UpdatePlayMode call is in here as we don’t have the others yet. You can see the power of this: it’s now really easy to steer the update logic.
After the JSR call we could go back to the loop start label, but for now I left the border colour change in there so we can see how much screen (raster) time our code is using. This will let us easily spot potential speed issues. Once satisfied we can change the DEBUG const to false, and this code will not be assembled any more. We will elaborate on speed (profiling) in a later post.
Nice. However, this change means we need to re-structure some of the already available code. Each mode will need the following components: Enter, Update, Leave.
The Enter component takes care of setting up the necessary bits in order for the mode to be entered correctly. For instance, entering the play mode requires that the score is reset, the play screen is printed and the first block is selected. The Update component will update the game and render. The Leave component will end the mode and set the next mode. So for the Play mode, this will be the Game Over mode.
We can also move the play code to its own file now. This makes editing source really easy as it’s concentrated. So we create play.asm, and move all relevant bits to there.
Note
I can show the complete source screenshot here, but that is rather large and it will be a re-hash of earlier posts. It’s also easier to point to the GitHub file here.
Running the game now results in being able to play as before, but now, when the game over situation is reached, the game stops reacting because the mode is set to MODE_GAMEOVER, but there is no mode subroutine yet! See above screenshot for that bit of the loop.
This does prove though that the concept works and now we can easily add a new mode: Game Over.
Game Over Mode
The game over screen on the Game Boy is a funny thing. It consists of three steps: the well is filled from below with solid blocks. Then it is cleared, again from below, and finally the game over message is displayed. The big change is of course that instead of doing all the filling and clearing in one frame we need to do one line per update to animate the filling.
Let’s create the new file gameover.asm, and define the three steps:
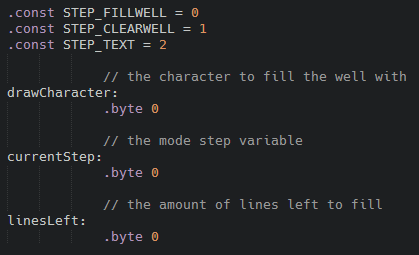
We also define some bytes to help us with the step choice, and a line counter.
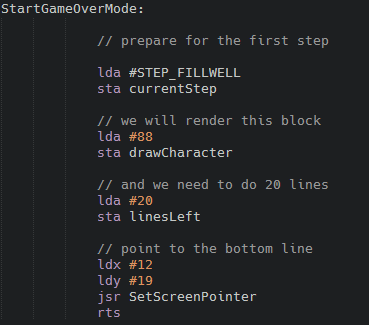
When this mode is started, the step is set to STEP_FILL_WELL and that step is performed in the update part of the mode. At the end of that step, STEP_CLEAR_WELL is set and performed. At the end of that step, the message is printed and the last step is waiting for a key to be pressed, called STEP_WAIT.
The actual update code for this mode is shown here:
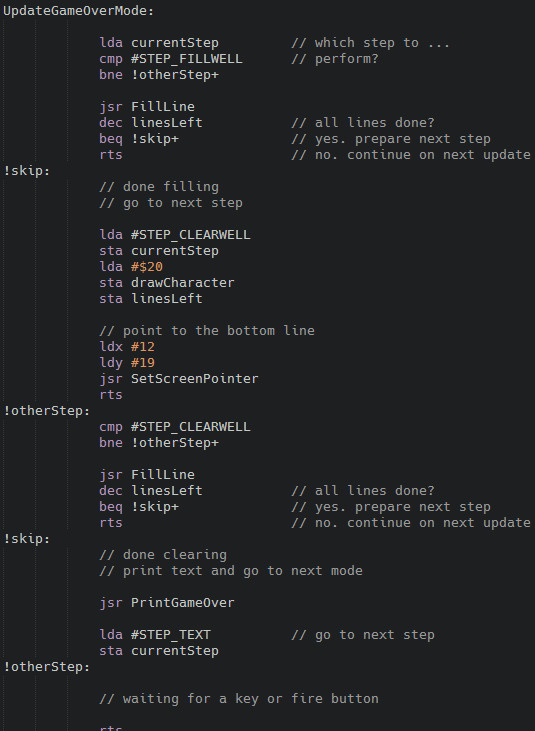
At the beginning a choice is made which step to perform. It’s simple: it is the same concept as the game mode, but does it within the game-over mode.
The final step will check for a key or joystick button, as no changes need to happen on the screen. That code is not there yet.
Filling and clearing the well can be done by the same routine so we define that as a subroutine and we change the drawCharacter to which is needed for that step. First a solid block and then the space character (#$20). Here is that fill routine:

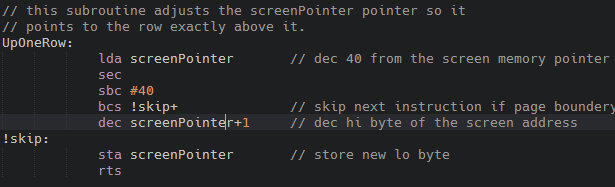
We also add UpOneRow to the blocks.asm file. It’s a variation of the DownOneRow routine we already have and it will enable us to draw in reverse order:
Printing the game over text is a variation of the DrawScreen code. Why? As the text is a bit more complex than the pause mode text, I’ve made it in Char Pad and exported it as `tetris_gameover.raw“.
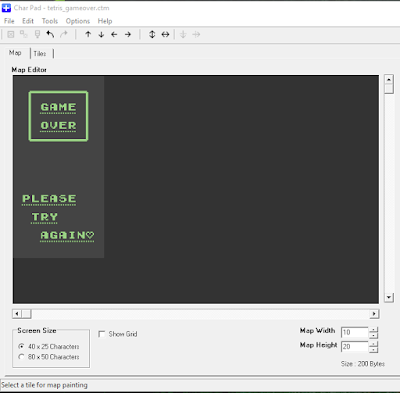
Isn’t that nice, with a lovely friendly heart at the end. No hard feelings, right? This data is imported in the same manner as the play screen itself is imported in the main file.
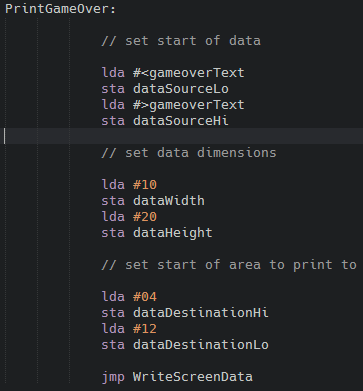
We should not like the fact that we are now creating a 3rd variation on a screen printing routine, so let’s try a little standardisation here. Let’s set up data width and height, and the screen location to start drawing to. Later on we can adapt other screen printing routines to use this as well:
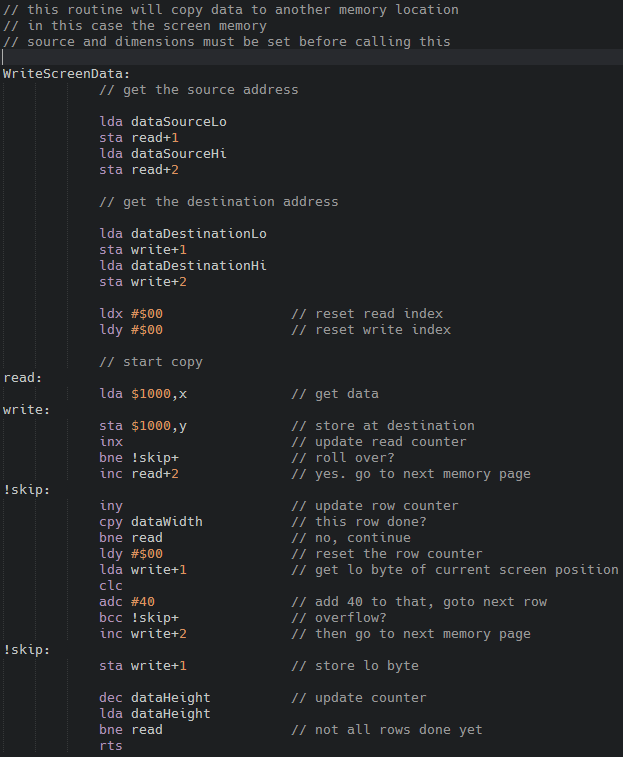
Here is the code to print this 10x20 block of data:
Anyway! The end result is pretty convincing:

Leaving the game over mode shall take us to the high-score entry mode, called MODE_ENTERNAME. But for this we need a high score list!! That will be the next entry of this series.
Conclusion
We start to feel the need for some more standardisation. Often it is good to just write a routine and get the job at hand done. Repeating yourself twice in a program is ok, but when more and more similar code starts to appear we need to look at unifying that functionality into some generic code.
This post was a first step towards that. We now have a nice loop, with modes and steps, and we have made a generic approach to get data from memory onto the screen. As that is where a lot of the action is done, we will gain the most by doing this in a more clever way. Just because we write in low level assembler code, doesn’t mean we cannot do NICE THINGS. :)
So far go good. We’ll get there in the end! On to Tetris in 6502 - Part 11.