So, here we are again with the fifth part of coding Tetris in 6502 machine code on the Commodore 64, because why not? We nearly have a game going: blocks are falling, collision detection is happening and new blocks are spawned randomly. So far so good. To get the game really going we need line scanning and removal.
Tip
As a reminder: you can check out the code on my GitHub page.
This post took the most time to write so far. Well, not this post itself but I went through several iterations of the code and though I have something that works, I am not entirely happy with it yet… Luckily there will be a post about re-factoring and optimisation later on. Until then, this will do. So let’s go!
Also, if you do have tips on how to do this more efficiently or more cleanly, then please leave a comment!
Line Checks
So, what do we need to do with line checks? After a block has been positioned the game should look at each row (line) and see if it contains no spaces. If it is a complete line, it is to be added to a list of made lines. The maximum amount of lines to make is 4, as this is the length of the long, straight Tetris block.
So here we go. Let’s scan the playing field for full lines:
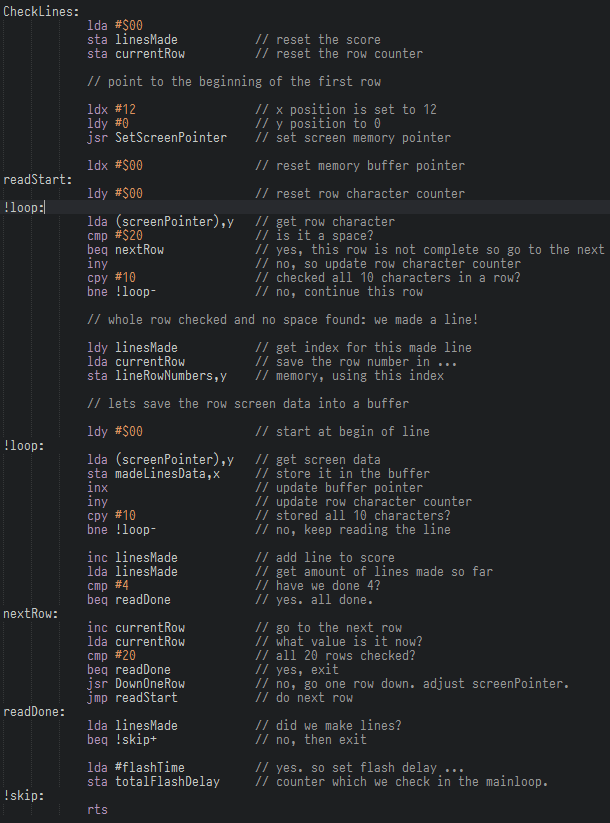
It’s a bit large, I know. The zero page screen pointer is set to the first row and from there we move down. If a row is filled then a line is made; the linesMade counter is updated, and the row number is saved in an array. After that, the row data (screen data) is saved in a little buffer. This will be used later on when the lines must be hidden and shown when they flash.
Note
In the old 1992 version I made I used sprites to cover the screen data, and turned these on and off. That’s another way of doing it and looking back it was much easier. :) Read on and see why.
The scan continues until the bottom is reached, or 4 lines are detected. When scanning is done, a timer is set when there are lines made. This timer determines how long the lines will flash. Here is the definition of the buffers:

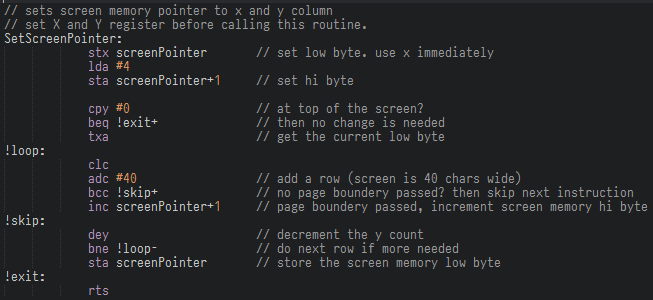
Also, I created a new function to set the zero page screen pointers. It uses the .X and .Y registers, and it’s a simpler version of SetScreenPosition:
Lines Flashing
After detecting the lines, we let the game flash these for a few times before removing the lines from the screen. So, a counter is needed for the delay between hiding and showing the lines, and a counter to keep track of the total slashing state. Here is the definition of the times:

And here are the timer definitions:

You also see a flag which is used to determine whether to show or hide the lines. The totalFlashDelay counter is being set at the end of the scan lines subroutine as you can see in that code above. The other is being used in the FlashLines routine below. Here is the flash code itself:
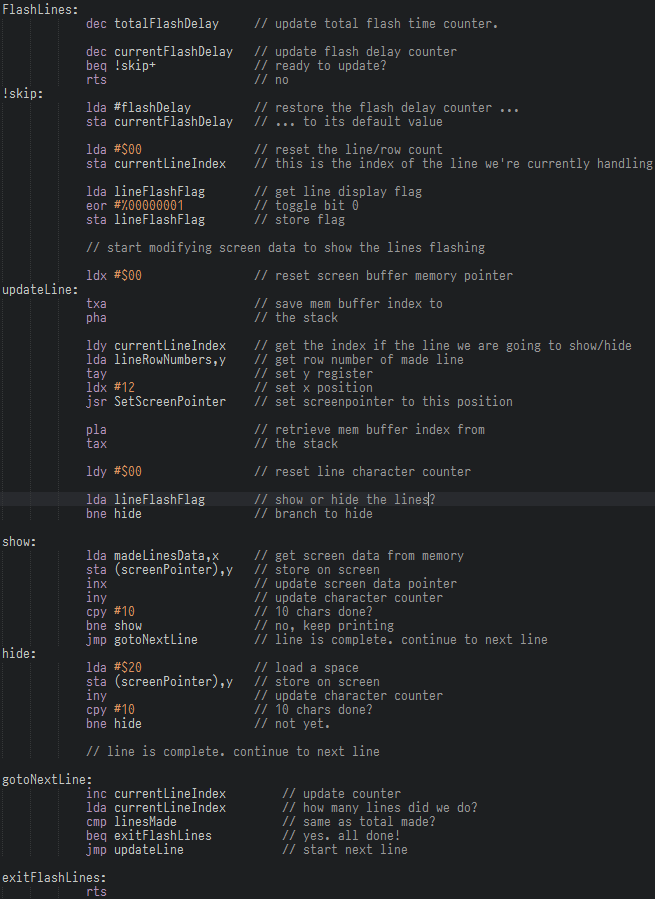
So, the code walks through the made line rows, and shows or hides them according to the setting of bit 0 in the lineFlashFlag value.
The data we saved in the madeLinesData array in the previous routine is used to draw the lines.
After this is done for a few times (this check is being done in the main loop which I will show later on) the lines are removed from the playing field.
Line Removal
Data above the made lines should fall down to where the made line was. This needs to be done for all made lines. We will not deal with gravity, we use the old Gameboy Tetris way of removing lines.
This is a tricky bit, and it took some time to get right. It is split up in a few routines to make things easier to get right. Here is the main RemoveLines function:
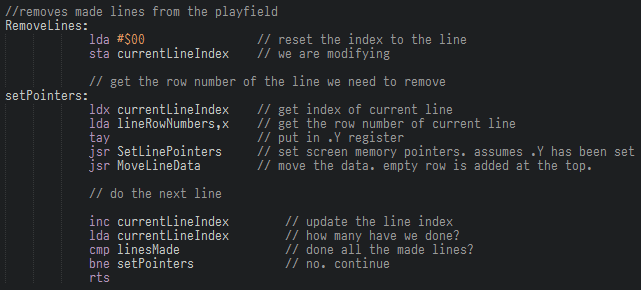
This is a simple loop to walk through all the made lines (rows) and move data above them down one row. When this is done for all rows, we should have removed all the lines. The work is done by SetLinePointers and MoveLineData.
Here is the first one: Its job is to get the two pointers set to the correct rows. One is the made line row, and the other is the row above. After much fiddling around I got it down to this bit:
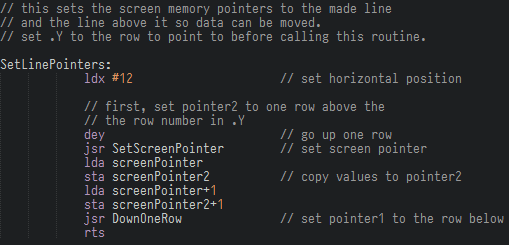
Oh, I set up a 2nd label to address $fd and called it screenPointer2. That’s about all the free zero page addresses used in a C64. Well, if you don’t want to disable all BASIC and KERNAL functionality anyway.
First, we go up one row by decrementing .Y with 1 and then setting the zero page pointer by calling SetScreenPointer. We copy these values to pointer 2. This gives us the screen area of the row above the made line. We then use the already available DownOneRow function to change the first pointer again to where we want it. We could have done iny and jsr SetScreenPointer as well, but this also gives the needed result.
Now the pointers are setup, we can start moving the data:
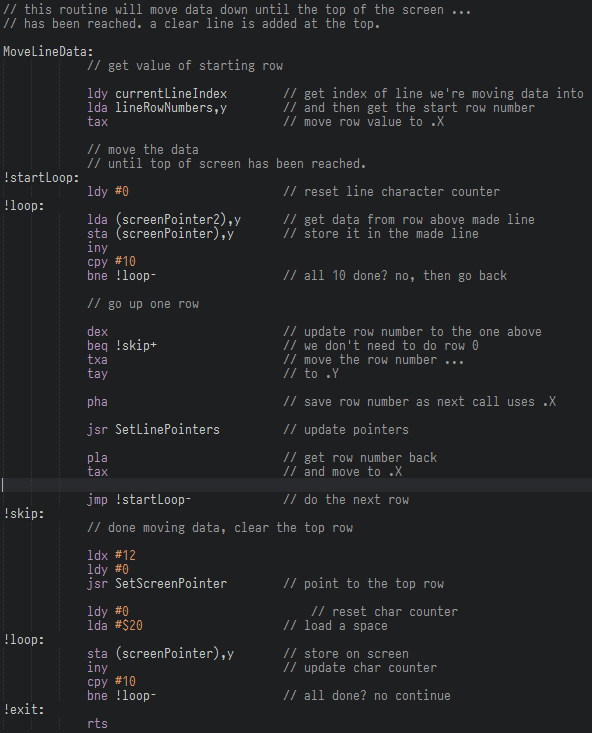
We move up from the made line to the top of the screen. I added some fiddling with the .X register by pushing it to the stack before calling SetLinePointers as that also uses the .X register. After reaching the top a blank line is inserted.
Main Loop
That’s a fair bit of code… It’s added into the main loop in the following way:
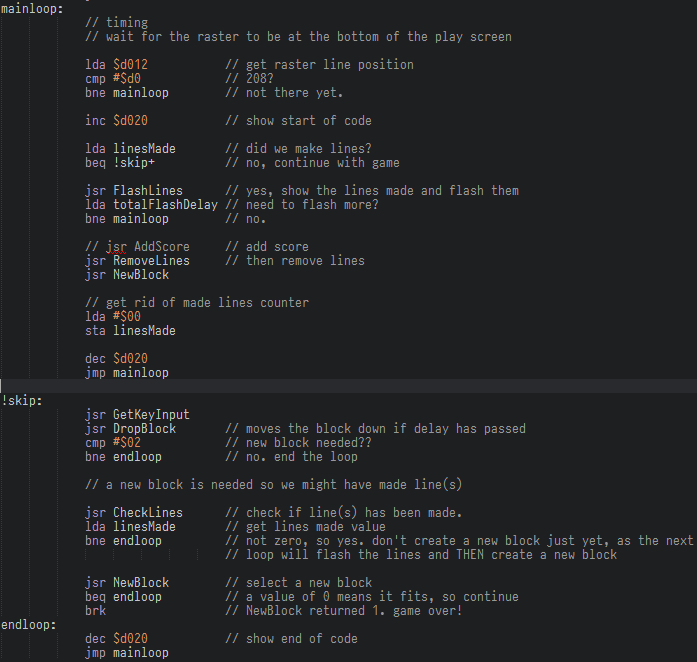
The main loop now checks if there are lines made. If yes, then these are flashed until the time runs out. After that they are removed… We still need to add the score mechanism and going up in level, but we now have a functional game!
Note: Playing with $d020 gives us an indication of the amount of time the code needs to execute. So far, lots of time left! We’ll play more with it in the optimisation post later on.
Let’s run it:
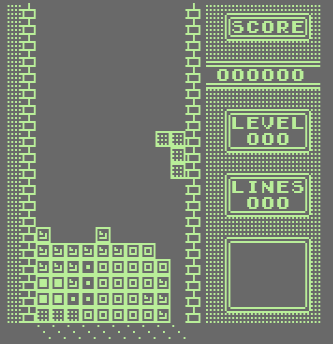
A perfect setup!

Lines removed, and the rest of the data is moved down. After that, a new block has been added. Nice! I’ve been playing this for a while and it is working really nicely. We have a game!
Conclusion
Working with screen pointers and moving data around can be daunting, but by breaking the larger problem up in smaller ones we were able to get the end result we were looking for.
In the end we needed a pretty hefty amount of new code, but we’re still OK, and well within the 4K range ($c000 - $cfff) with our code. Here is the output from the assembler:
Memory Map
----------
$3800-$3f3f character data
$c000-$c75e code

51038-49152 = 1886 bytes of code, a little over 1,8 KB.
This was the final bit to get real game play going. Next up is adding points. After that we move on to levels and changing the difficulty while playing.
Until then: have fun, and proceed to Tetris in 6502 - Part 6