Hello there and welcome to another post in this epic series.
The end is in sight! We are now adding the final touches to the game to make it feel better to the player and add some form of customisation to the screen colours. The player interface with the game is very important and can make or break the experience.
So now we introduce some sound fixes, input modifications and graphic options.
Note
As usual, the code can be found on my GitHub page for you to see and play with.
Sound Fixes
The music and sound effects were played at the end of the game play loop, and because of that we were having issues with the timing of the audio. As the time required to run the game loop can change each frame the sound would slow down sometimes. Highly annoying.
So a raster interrupt was introduced to run BEFORE the game loop to avoid any interference. This setup route is called when the game starts:
SETUP_MUSIC_IRQ:
		sei
		lda #<irq1
		sta $0314
		lda #>irq1
		sta $0315
		lda #$1b
		sta $d011
		lda #$80
		sta $d012
		lda #$81
		sta $d01a
		lda #$7f
		sta $dc0d
		sta $dd0d

		lda $dc0d
		lda $dd0d
		lda #$ff
		sta $d019
		cli
		rts
irq1:
		lda #$ff
		sta $d019
		jsr music.play
		jmp $ea31
I stole this routine from the Kick Assembler example files, and adapted it slightly. Instead of changing the IRQ vector at $FFFE, I use the vector in $0314, as I want KERNAL IRQs to continue. We are depending on those for keyboard scans, etc.
The above screenshot shows the moment when the various program parts are called. The top white border colour change is when the music plays and the bottom colour change is when the game code runs. All screen updates are done in the game update code, as you know, while the raster bar is at the bottom of the screen so we will have no flicker in the screen buildup or strange artefacts. This was already the case.
Also, to stop sound effects from overlapping and blocking each other out, a timer was needed to introduce a delay before a new sound can be played. I added a table with the delays for each sound. Playsound can be called when a sound effect or music is required:
// set accumulator before calling this
// it will not play when the sounddelayCounter is not 0
playsound:
		ldx sounddelayCounter
		bne !skip+
		tax
		lda sounddelay,x
		sta sounddelayCounter
		txa
play:
		ldx #0
		ldy #0
        jsr music.init
        jsr music.play
!skip:
		rts

sounddelayCounter:
.byte 0

sounddelay:
//    0  1  2  3  4  5  6  7  8 9
.byte 10,10,10,35,35,25,25,10,1,1
The sounddelayCounter value is changed in the play loop in play.asm, once per frame. It counts down to zero:
lda sounddelayCounter
beq !skip+
dec sounddelayCounter
!skip:
Simple as that.
Color Changer
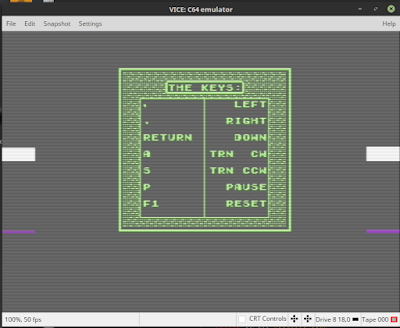
Some people have good taste, and like the colour combination I’ve put in. Some may want to wander from perfection and change the colours. This can now be done by pressing F3 (screen colours) and F5 (character colours).
This is achieved by scanning for these key presses in the main loop. Changing the screen color is easy:
		inc $d020
		inc $d021
Changing the character colour is a bit more involved: only changing the colour RAM is not enough. When you print something to the screen, this is done in the current cursor colour and has nothing to do with the screen RAM values. We need to change the cursor colour to the correct value and we can to that by printing an ASCII code.
The ASCII table of the C64 is a bit weird, but there is a table in the Programmers’ Reference Guide. These ASCII values don’t line up AT ALL with the colour values that are in the colour RAM, so we need a little table to map it to the colour RAM values:
chrColorCodes:
//    0   1 2  3   4   5  6  7   8   9   10  11  12  13  14  15
.byte 144,5,28,159,156,30,31,158,129,149,150,151,152,153,154,155
When the colour RAM is changed, the appropriate CHR$ is also printed:
SET_CHAR_COLOR:
		ldx #0
		lda charColor
!loop:
		sta $d800,x  // store in color ram
		sta $d900,x
		sta $da00,x
		sta $db00,x
		inx  // increment counter
		bne !loop-  // continue?
		ldx charColor
		lda chrColorCodes,x     // get correct chr$ code
		jsr PRINT
		rts
Nice!
Input Fixes
The keyboard input was a bit wonky (as was the joystick) so changes were needed to make it feel as it should. There is nothing worse than a game that does not react in the way you expect. I moved the keyboard and joystick scan to the main loop and removed all scanning from the game modes. This means that the keyboard and joystick are read ONCE per frame resulting in stable results.
This helps stability of the read input as reading the keyboard buffer can only be done once each frame. Any subsequent query will result in no input detected. Not good.
This is the new keyboard scanning code:
GetKeyInput:
		lda keyPressed  // get held key code
		cmp previousKey  // is it a different key than before?
		bne !skip+  // yes. dont use key delay

// key is the same. update delay counter
		dec keyDelayCounter
		beq !skip+
		lda #NOINPUT
		sta inputResult
		rts
!skip:
		// restore key delay counter
		ldx #INPUTDELAY
		stx keyDelayCounter
		// save key code for next update
		sta previousKey

		cmp #NOKEY
		bne !skip+
		lda #NOINPUT  // yes
		sta inputResult
		rts
!skip:
		cmp #DOWN
		bne !skip+

		// if we press down, the delay is shorter
		ldx #4
		stx keyDelayCounter
!skip:
		sta inputResult  // store input result
		rts
This also solves an issue when pressing DOWN. The times between the down movement were changing all the time, now it is stable. Adding a little section to have a shorter delay when pressing DOWN makes a manual drop behave like it should.
To make the time delays between inputs more stable, I also added the same structure and a separate delay counter for the joystick so there is no interference.
Conclusion
DONE!!
The hardest part of game development is finishing the project and while this series has been a long time in the making, I was determined to finish it and THEN move on to other challenges.
For me, this has been a great exploration of the Commodore 64. I hope you enjoyed it as well, and that you now have a better understanding of game development on the C64, with assembly. A lot of things in the C64 we did not even talk about, like sprites, multi-colour, raster interrupts, scrolling, border manipulation etc., but these are all things that were not necessary for this game. It would be great to play with that in a future project though! :)
Thanks for reading and showing an interest in this great little machine that gave (and keeps giving) so much pleasure the world over.
Happy coding and see you next time!
Further Reading
I spotted a link on reddit towards this brilliant article, which you will probably enjoy if you have followed my series about programming Tetris on the C64.
http://meatfighter.com/nintendotetrisai/
The C64 and the NES both used the 6502, so there is something to be learned here. What is interesting to me is how different their approach to storing data, spawning blocks and rotations is.
Also, generating random numbers with the Linear feedback shift register algorithm sounds intriguing! I might use that in a later version, as I now use the SID chip to create a random number. That might not be handy when I start using sound :)
There are also little nuggets concerning getting the right block spawn ID, and using tables to get to values directly instead of using loops and additions… They used lots of lookup tables!
Very insightful. Read it if you like 6502 programming.