Welcome to the 2nd part of this series of posts. Who knows where we’ll end up? In the previous post we got to the point that we could select and print a block on the screen.
Next up must be rotating blocks and moving blocks.
Block Frame Animation
Now we’re able to select and print a block, the next step is to animate it. Blocks can be turned clockwise or counter-clockwise so a little animation system is needed. We need to be able to define the animation frames for each block, and we should be able to ‘walk’ through these frames, and loop around when the end or beginning of the sequence has been reached.
My previous Tetris version was only able to rotate clockwise, so this is the first occurrence of feature creep! Always a welcome sign, isn’t it? :)
So, for each block we must be able to define which frame numbers belong to which block ID. I’ve come up with this scheme:
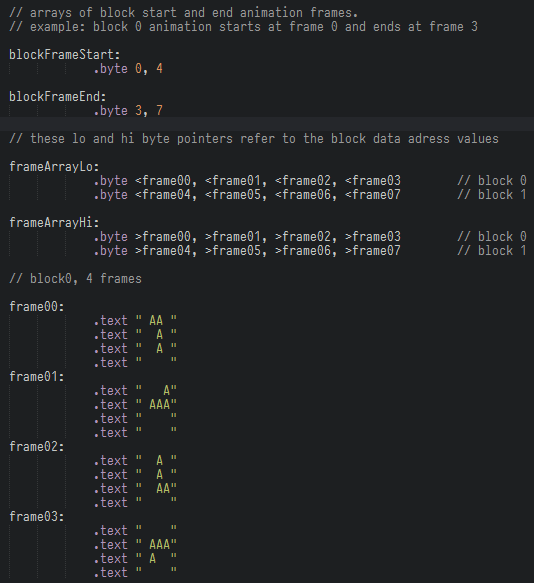
blockFrameStart and blockFrameEnd define arrays holding the start and end frames of each block ID. These frame numbers match the animation definitions as seen in the above code.
The definitions for block 1 are beneath that. Here they are for completions sake:
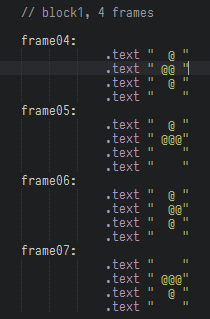
So, moving forward in the animation frames rotates the block clockwise, and moving back results in a counter clockwise rotation. Also, I changed the frame definition to a larger size, because I realised that the long Tetris block is 4 characters high. Rotating it means we need a 4x4 frame size.
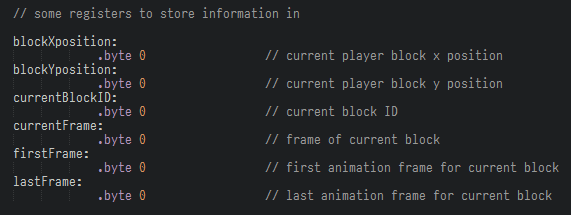
I added a few memory location definitions to store information about the current block (the block the player is currently controlling) so this information is readily available when playing the game:
These values are set in the following new subroutine:
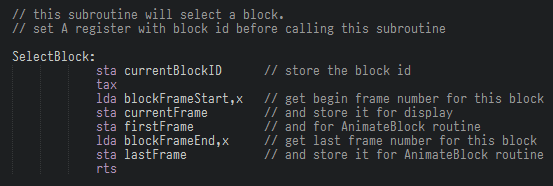
SelectBlock needs the block ID in the A register. It will also reset the block animation to the first animation frame. So now we have block 0, 1, etc. and we have animation frames for each block defined.
We now can add a subroutine for animating the block:
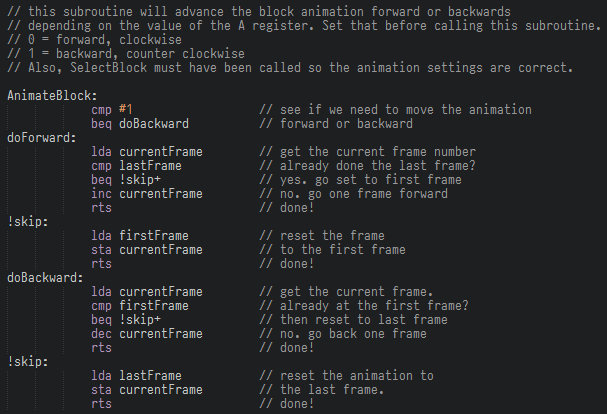
We set the A register to 0 or 1 and this subroutine will update the block animation. I slightly altered the earlier documented PrintBlock subroutine to look at the currentFrame value, instead of the Y register for selecting a frame.
Player Input
Moving the block is next . Looking for key presses is easy on the Commodore 64. We can use the kernel routine at $ffe4 to check the keyboard buffer. If the A register contains a 0 after calling this subroutine then no key is pressed, otherwise it will hold the key code (in PETSCII). There are other ways for reading the keyboard, but why make things complicated when we can use the kernel routines? It’s not like we are desperate for memory space.
As the keyboard is read 50 times a second, we need some kind of delay loop. Here are the definitions for the key codes and the delay counter:
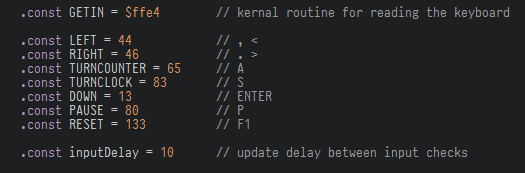
I’m not sure yet that a 10 frames update delay is enough or too much, but by defining it as a constant instead of putting it somewhere in the code it is easily changed. The same goes for the keys used.
When animating or moving a block the old version will have to be erased from the screen before the block is redrawn in its new position or frame. I copied the PrintBlock subroutine for that and made it print a space (PETSCII code #$20) instead of the block data. I called it EraseBlock. Here is the changed part:

With all that in place its time to add the GetKeyInput subroutine:
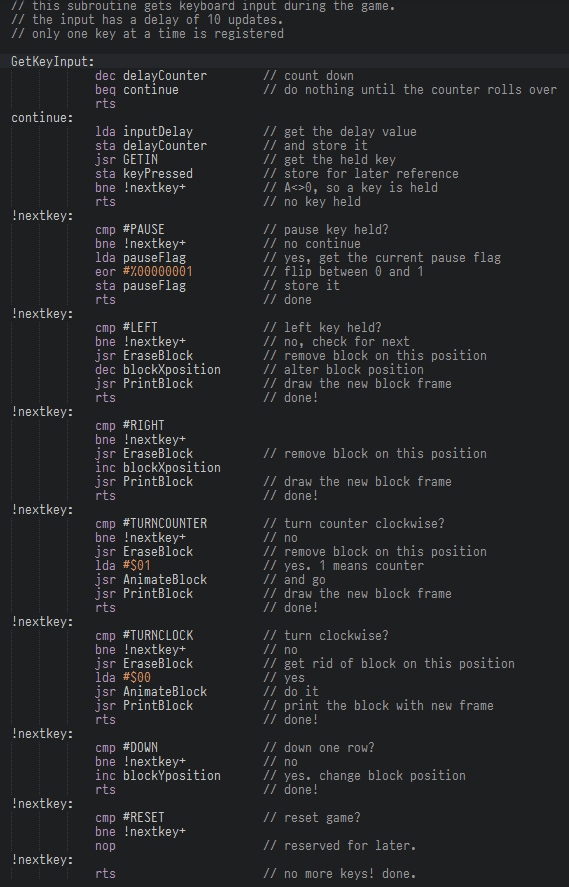
It’s a biggie, I was just about able to get a screen grab of that in one go! :) The first part is our key delay counter, and then each key is checked. Rotating or moving is done by removing the old block, updating the according setting, and then redrawing the block.
We also added the pause and reset key, but those will be activated later on. Also later, we will add joystick support, which shouldn’t be too hard once we have the keyboard and reactions to that in place. Hmm. How to turn left and right with one joystick button though? A challenge!!
I really like the Kick Assembler possibility to have reusable labels… It was a nightmare on the C64 to think up new labels for simple branch operations and it resulted in weird names which make no sense after 25 years! I should have thought of that then.
One thing that stumped me in Kick Assembler was the fact that I had to use a # before the key definitions in the code (#LEFT, #RIGHT, etc) . This is because I defined them not as hexadecimal but as decimal numbers. Not adding the # does not result in compile errors but weird behaviour.
Running this code shows the block, and I can move and rotate it:

Concluding
The chosen data structure determines how we can use the information. With the described method we can easily get to the information we need, and it is easily extended with more block definitions and frames. I’m using arrays and references, just like in modern languages, but the definition of them is more basic. Well, it can’t get more low level than machine code, which is part of the fun. For me anyway :)
Next up is designing a game screen, so the block has a window to fall into and we have a place to print scores, the next block to fall, and more…
We also will look into splitting up the source code in more manageable smaller files, because the code is already becoming confusing to navigate. I will also add a repository on GitHub to share the code.
Go on to part three here: Tetris in 6502 - Part 3